Setting up a Dreamweaver Site to Create PHP Scripts
Dreamweaver allows you to set up a Dreamweaver site with PHP and MySQL. In this site, you can create PHP scripts and test them as easily as you can setup and view HTML only Web sites. This document assumes that you are familiar with Dreamweaver and have used it to develop Web sites without PHP and MySQL. In this document, I show you how to set up Dreamweaver to develop PHP scripts that can access MySQL databases. You must have PHP and MySQL set up and working on your computer before you follow these instructions to set up Dreamweaver for PHP scripts.
Your Web site development environment normally includes two sites:
- Your Web site: The location where the public views your Web site. This is a site which is located on the computer of a Web hosting company.
- Your development site: The location where you develop your web pages. When your pages are complete, you then move them to your Web site. This site is located on your local computer, the same computer where Dreamweaver is installed.
When you set up a Dreamweaver site, you define a Local site and a Remote site for your Dreamweaver site. The Local site is your development site, on your local computer. The Remote site is your Web site on your Web host's computer. To set up a Dreamweaver site for PHP use, you define these same two sites. However, when you setting up the Dreamweaver site for PHP, two things are different:
- The Local site location: When setting up for dynamic development, your local site needs to be in a location where your Web server can find it. For example, if your Web server is Apache, it looks for your web page files in a directory named htdocs, located in the directory where Apache is installed. You need to store your files in the correct directory and point your Dreamweaver local site at this directory.
- A third site: When setting up a Dreamweaver site for PHP, you need to set up a third site, in addition to the Local and Remote sites. The third site is called the testing site. The testing site is the same as the Local site. So, you set up the testing site with the path to the same directory as the Local site.
The following steps walk you through the entire process of setting up a Dreamweaver site for dynamic Web development:
- Go to Site > New Site in the menu bar.

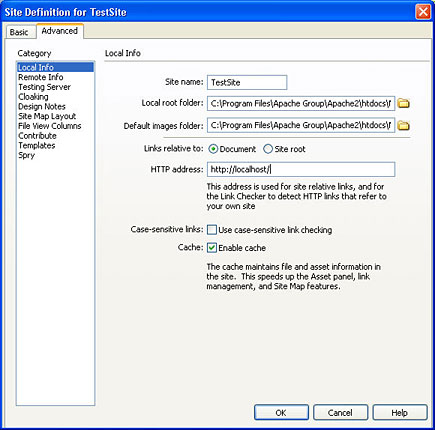
- The Site Definition dialog appears. The following image shows the dialog with the Advanced tab open. If the Advanced tab is not open, click Advanced to open it.
Set up your Local site:
- Select Local Info in the category box on the left side of the dialog. Local Info may already be selected.
- Type a name for your site.
- Type the path to the folder where you want to store your Local site. Or, click the folder icon and navigate to the folder where you want to store the files for your Local site. As described above, the directory path should be something which points to a folder that already exists in a location where your Web server expects to find it. For instance, your path might be c:\program files\apache Group\Apache2\htdocs\dwsite. In this case, dwsite is a subdirectory you created for this site. This is where you will put all your Web site files. Another example might be that you installed using XAMPP for windows. Your local directory could be c:\xampp\htdocs\dwsite (Windows) or Applications/xampp/htdocs/dwsite (Mac).
- Type the path to the default images folder where you want to store images for your Local site. Or, click the folder icon and navigate to the folder. Often, this is a subfolder in the Local site folder named images. Dreamweaver will automatically store your images here, and look for images here, unless you specify otherwise. You are not required to enter a path to this directory, but it's a useful Dreamweaver feature.
- Type the URL to the Local site. The URL prefix is the path to the folder where your local site is stored, starting with http://localhost. Localhost includes the entire path to the site where your Web server looks for the files, such as c:\program files\Apache group\apache2\htdocs or c:\xampp\htdocs or applications/xampp/htdocs. If you set up a subfolder for your site named dwsite within htdocs, the URL prefix would be http://localhost/dwsite/. Be sure to include the slash at the end of the path.
Set up your Remote site:
- Select Remote Info in the category box on the left side of the dialog. The following dialog appears:
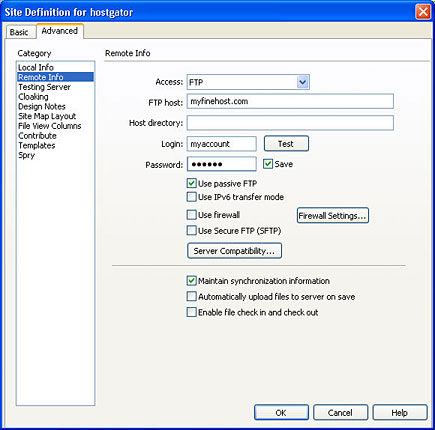
- Select FTP from the Access dropdown list at the top of the dialog. The remaining fields will appear.
- Enter the information you need to use to upload files to your Web host. You need to enter the URL to your Web host that you use to FTP files to your Web host. You also need to enter the user name and password that you use to upload files to your Web host.
- Check Use Passive FTP.
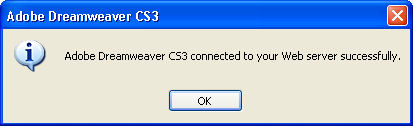
- Click Test. Dreamweaver will connect to the Remote server (your Web host) to make sure it can. Hopefully, you will see the following:
In some cases, you may see the following:
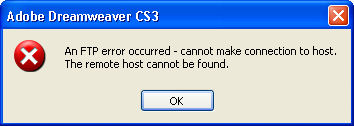
If you see this error message, you have probably entered some of the connection information incorrectly. Try some alternatives. If you can't figure out what you should be using, you can find out from your Web hosting company.
Set up your Testing site:
- Select Testing Server in the category box on the left side of the dialog. The following dialog appears:
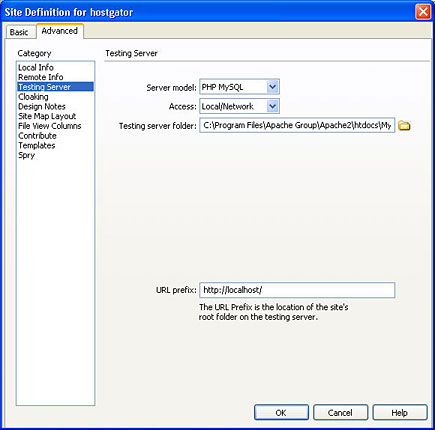
- Select PHP MySQL in the Server model dropdown menu at the top of the dialog. The Access dropdown menu appears.
- Select Local/Network from the Access dropdown menu. More fields appear.
- Type the path to your Testing site. This should be the same path that you entered for your Local site. Or, click the folder icon and navigate to your Testing site folder, which is the folder where you store the files for your Local site.
- URL prefix is the same URL that you entered for your Local site. It should include http://localhost/, which is the path to the htdocs directory. Then add the rest of the path to the directory where your main site is located, such as http://localhost/dwsite/.
Save your new site:
- Click Save. The Manage Sites dialog appears. Your new Dreamweaver site appears in the list of sites.
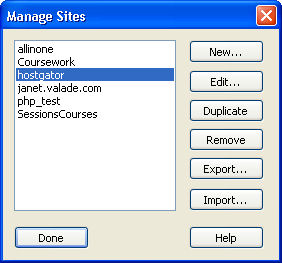
- Click Done.
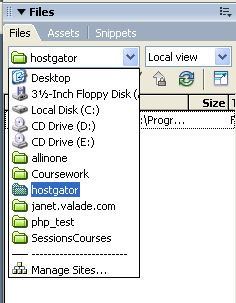
Your new site now exists. In the Files panel, shown below, all the Dreamweaver sites can be accessed from the dropdown list, so you can save and access files in your new Dreamweaver site.
Your new site should be empty. It's important that your Local site and your Remote site have the same folder structure. Your site on your Web host may already have a directory structure. For instance, some Web hosts provide a folder on your site where you should store your Web site files, such as public_html. To ensure that your Local site structure matches your Remote file structure, you should download the existing site from your Remote site before creating any new Web site files in your Local site. To download the Remote site, click the green down arrow down arrow ![]() on the Files panel.
on the Files panel.
You can switch between the Local site and the Remote site by clicking the site you want to see in the dropdown menu, as shown below:

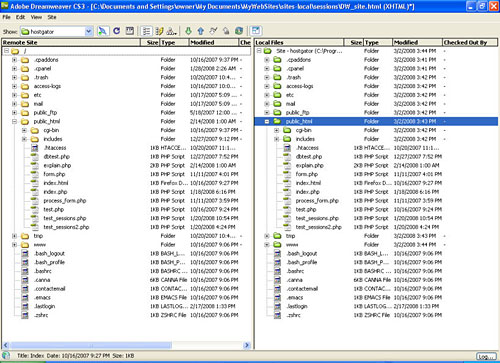
To see your Local site and your Remote site side-by-side, click the Expand button Expand button ![]() . The sites are shown as below. To return to the Files panel, click the Expand button again.
. The sites are shown as below. To return to the Files panel, click the Expand button again.
WARNING: The files you download from your remote site might include a file named .htaccess. You should not store this file in your local site. This is a file that configures Apache. The file on your remote site might contain directives that are required on your Web site but cause problems on your local site, even including disabling your local site.
So, if your download includes a file named .htaccess, be sure to delete it from your local site.
You may need to edit the .htaccess file on your Web site to change a setting for your site. To do this, you can download it, edit it, and then upload the edited file. When you do this, be sure to delete the .htaccess file from your local site after you upload it.
You can create a new file in your new Dreamweaver site as follows:
- Select the Dreamweaver site in the Files panel.
- Create a new file.
- Click File >Save As. A Save dialog opens to the folder for the Dreamweaver site that is selected. If you want to save the file in a subfolder, navigate to the subfolder.
- Type a file name and click Save.
- The file is now shown in the Files panel for the Local site.
To upload any file in your Local site to your Remote site, highlight the file name in the Files panel and click the blue up arrow  . You can upload an entire folder by selecting the folder and clicking the up arrow.
Now, with your Dreamweaver site set up, you can manage your Web site much easier using Dreamweaver features.